
Introduction
Here’s an underappreciated fact: landing is mandatory! So let’s invest some time in “Ground School” to strengthen our academic knowledge of the forces at play.
You may think this is a rather tedious exercise… After all, who wants to go to school?! I believe, however, that the most effective path to progress involves learning before doing – and that the enjoyment we all seek out of these toy airplanes requires progress. It’s so much more fun to fly with purpose! If it gets a little too academic for you, then check back in with me for Part 2 of my Master Your Landings series (subscribe to our newsletter to get notified when it comes out) where we’ll explore practical advice for transmitter setup, airplane setup, flying techniques and tips to grease your landings like a seasoned pro.
In this article I hope I can provide some insight into the knowledge you should have to be able to consistently nail those landings, even with an aerobatic airplane not known for its fantastic landing characteristics. I’m going to bring to bear the knowledge I’ve learned in my 4000+ hours as a full scale pilot, 1200+ logged hours I’ve spent teaching students these concepts in the real world, and 15+ years I’ve spent competing in F3A. We will borrow concepts from full scale aviation but keep all of it relevant to our modeling world while learning what it means to successfully land your airplane where you want to, every time.
Outline
- Goals for a “Successful” Landing
- The Aerodynamics
- The Inherent Instability of the Tailwheel Configuration
- Stabilized Approach Concept
- The Human Factor
Goals for a “Successful” Landing
Many love the saying that a successful landing is “any landing that keeps the airplane in one piece!” My standards are a little higher than that and I think yours should be, too. You shouldn’t be worried about dorking in your landing or breaking your gear legs – even on our fragile competition birds.
A successful landing should have the following attributes:
- Touchdown within a few feet of your intended point of landing
- Traveling along your intended track down the runway
- Optimized for the lowest impact to your aircraft possible, keeping in mind touchdown speed, touchdown impact, roll out, and side loading
We have a lot of things working against us to meet this lofty definition of a successful landing – and, this is a lofty definition! Landings can be a very difficult maneuver! Like everything else, to perform your landings with consistency and precision, you must fly with purpose and be armed with the knowledge you need to make your practice productive. So – let’s work on the latter and jump into ground school.
The Aerodynamics
Angle of Attack
Any discussion about landings must come with an understanding of angle of attack. The technical definition tells us that angle of attack is the angle between the chord of the wing and the direction of the relative wind. To keep it practical, we will think of it as the angle between the wing and the track of the airplane. When flying straight and level this angle is so close to 0° that we can’t make out the difference. Now, think about a landing where we are trying to touchdown with the all three wheels at the same time and the airplane is angled upwards but still traveling in close to level flight (or just slowly descending). Our angle of attack is of course higher during landing than it is during straight and level flight.
Angle of attack is critical to grasp because of the fact that every wing stalls at the same angle of attack, every time, no matter what. This is called the critical angle of attack. Once we realize this, we can start to practice our landing approach and flare so that we never go below our minimum controllable airspeed which in calm conditions, will be just above stall. The angle of attack at which the airplane flies will give you consistent performance characteristics regardless of a headwind, tailwind, or crosswind. It won’t matter what power setting you’re using, how heavy your airplane is, or how hot it is outside. Your airplane can look like it’s speeding across the sky or literally hovering in front of you and, if the angle of attack is the same, your airplane will respond the same! Using this knowledge to your advantage (which we will cover in part 2) is the only way to land successfully every time, in every condition.
Airspeed vs. Groundspeed
It’s important to understand the difference between the speed of the airplane over the ground and the speed of the airplane through the air. We see the airplane traveling over the ground but the airplane only feels the speed it travels through the air. This means, if there is any wind, the airplane will appear to fly slower into a headwind and faster in front of a tailwind, even though the airspeed is the same in both scenarios. As our airspeed increases, our control effectiveness increases, so we must adjust our inputs accordingly. The opposite is of course true as our airspeed decreases. We are focused on consistent ground speed in our competition flights but are solely concerned about airspeed during landing.
Turbulence
There are two types of turbulence that affect us the most with our relatively small models and low altitudes: mechanical turbulence and thermal turbulence.
Mechanical Turbulence
We will define mechanical turbulence as:
Air instability caused by the friction between the air and the ground, especially irregular terrain and man-made obstacles
In our case, mechanical turbulence is almost always caused by trees or the big shade pavilions we have in the pit areas. As the wind travels over these large obstacles, friction and small pressure changes cause the wind to tumble and create eddies. These eddies will chew your airplane up and spit it out sideways! They can be a huge obstacle to a successful landing and learning the proper techniques to minimize their impact on your landing is a must.
Thermal Turbulence
Thermal turbulence is
Convective currents caused by the irregular heating of the earth’s surface
Convection in our case is the repeated cycling motion of air heating, rising, cooling, falling, and heating up again to continue the cycle.
We all know about thermal turbulence instinctively if we’ve been flying for any amount of time. We know that the air is bumpier and more unpredictable in the middle of the day. This is, usually, due to the sun heating up the ground throughout the morning. Even if the terrain you’re flying over looks uniform chances are it heats up in an irregular fashion, causing hot spots and cool spots. These localized hot spots start these convection currents and make precise aircraft control especially difficult.
Whereas mechanical turbulence is more likely to be high intensity with short bursts of instability that can smack your airplane down with force, thermal turbulence is a steadier, slightly more predictable source of turbulence more likely to cause discomfort and anxiety than a broken airplane.
However, thermal turbulence actually makes any mechanical turbulence worse, as it fuels the eddies created by the trees or shade pavilion. A 20mph wind traveling over large trees close to the runway in the middle of a summer day is a lot like a bottle of lighter fluid squirting into your campfire. Watch out!
In Part 2, we will discuss the importance of altering our landing approach with additional airspeed to deal with turbulent conditions, including the setup and flying techniques you need to be aware of to deal with the worst conditions. Sign up for the newsletter at the bottom of this page so you won't miss it!
Crosswinds
I have found many misunderstandings in the RC community regarding crosswinds throughout my years enjoying this hobby. This is especially true for landings. We often decide to do our best to fly into the wind for our landings, runway orientation be damned. This means landing across the runway or trying to land at an angle going away from you or coming towards you. This can be misguided at best and unsafe at worst. While I’m not saying these are not sometimes useful or even necessary techniques, they are not a replacement for understanding best practices in handling your airplane for that tricky crosswind landing.
Let’s look at some of these bonkers full scale airliner crosswind takeoffs and landings to provide a basis of discussion.
**WARNING** The following video contains material known to be addictive in the realm of aviation, and may cause the beginning of an hours long session of YouTube, herein referred to as a “rabbit-hole”, which has the potential to harm the productivity, focus, motivation, and attractiveness to the opposite sex of the user. CK Aero is not liable for any personal harm, damage to relationships, loss of income, or any other negative side effect of said rabbit-hole. Please consult your flight instructor if symptoms worsen.
Crab Angle
Crab angle is simply the angle of the fuselage relative to the track of the airplane. This is really clear in the above video when you see the airplane angled dramatically off to the side but still traveling down the runway. In part 2, we will discuss best practices to reduce our crab angle as much as possible before touchdown to avoid side loading and therefore minimize the impact to the airplane.
Upwind Lift
We can all intuitively understand crab angle, but this concept is maybe not quite as obvious. Did you know that a crosswind will cause your airplane to roll? We can see the dramatic crab angle and subsequent yaw motion of the fuselage but it’s easy to overlook the effect on lift and subsequent roll that a crosswind creates.
In a crosswind your upwind wing “sees” more air than your downwind wing. The fuselage of the airplane blocks a portion of that crosswind that is hitting the upwind wing directly and this creates a difference in lift between the two wings. The other thing to remember is that this effect becomes more pronounced the slower you fly. The wind speed stays the same but your airspeed is decreasing, therefore the effect becomes more pronounced because the speed of the wind is growing in proportion to the speed of the airplane.
To counteract this effect we must use aileron input into the wind, and it must increase as we get slower. The first takeoff sequence in our YouTube video, which you can find at the 37 seconds mark, is the perfect representation of this as we can see the airplane just after takeoff rolled slightly away from the wind. The pilots were caught out and should have used more aileron correction, or there was a significantly large gust of wind that caused this rolling motion too quickly for the pilots to react.
Side Loading
Side loading describes the loading on the landing gear when you land with some crab angle other than zero degrees. This exerts a sideward force on your wheels and landing gear, hence the term side loading. In full scale aviation we spend significant effort and training time dedicated to the skill of crosswind landings so that we can avoid side loading. A cornering angle, or the angle between the direction of the tire and the direction of flight, of only 10° creates a side load equal to half the supported weight (FAA Airplane Flying Handbook 8-17). Imagine a rough touchdown in bumpy crosswind conditions and you can imagine how easy it is to put destructive force into your wheels, axles, and/or landing gear legs!
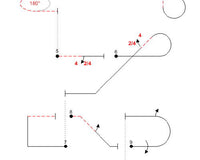
Approach Speed and Landing Speed
In full scale aviation we use the concepts of approach speed and reference speed (for you fellow aviation nerds that’s Vapp and Vref). We’ll skip over the discussion on reference speed and simply call it landing speed. In practical terms we just need to have a slightly higher speed for the landing approach than we do for the landing maneuver. On approach the airplane is subject to changing terrain that fuels thermal turbulence, eddies created by mechanical turbulence, and higher angles of attack as we maneuver the airplane to our desired runway alignment. These factors mean we want a larger cushion between our current angle of attack and our critical angle of attack (aka stall), which means we need to fly faster than we would as we transition to the landing maneuver just over the runway. We don’t have a reliable way to determine airspeed so we focus on angle of attack, which we can determine from the angle the fuselage is making relative to the airplane’s track. We will discuss this at length in part 2 but to give you an idea of what you should be looking for see the diagram below.

The Inherent Instability of the Tailwheel Configuration
An airplane with a tailwheel configuration has an inherent instability on the ground just like a grocery cart does when you attempt to push it from the wrong end. The airplane constantly wants to swap ends on the ground, a phenomenon known as the ground loop. Trent Palmer does a way better job explaining it than I ever could in the video below. It’s well worth your time!
Stabilized Approach Concept
In full scale aviation a stabilized approach is considered the cornerstone of every well executed landing and in keeping with our theme for this article, it should be the cornerstone of every one of your landings as well. A stabilized approach is always defined slightly differently depending on the context it’s used in, but the idea is to stabilize – or be setup to avoid large deviations to – the landing approach. You should endeavor to have your approach stabilized as soon as you make the final turn to line up with your intended runway track. In our context, this is what a stabilized approach consists of:
- Established and steady approach speed (or more specifically for us, we will focus on fuselage angle and throttle position)
- Lined up with the centerline of the runway
- A steady and unchanging descent angle
- All switch positions, trims, conditions, rates, etc. are set for landing
This is critical to your consistent success. Just like you have to have your wings level before you pull a radius, you must have your approach stabilized to set yourself up for a beautiful and soft landing.
The Human Factor
Here’s the catch to all of these concepts:
If you’re not focused and mentally engaged during your landing no amount of knowledge will save you.
Stay engaged even though you may not have a big score on the line for your landing. Stay engaged even if the weather is perfect! Always have a target landing spot. Remember to shoot for your target approach angle and throttle position. Fly the airplane through the entire landing, in the air and on the ground, until it’s fully stopped and the motor is disarmed.
A good landing not only impresses the judges and is greatly satisfying to perform, it saves wear on your airplane! We must treat our equipment with respect if we expect our equipment to treat us with reliability.
Fly with purpose, land with purpose, and you’re one step closer to mastering your landings!
Stay tuned for part 2 when we’ll finally get airborne and talk about the practical tips and techniques you need to never dork another landing ever again.
As always, let me know what you think down below in the comments!
Brett


3 comments
Gary Henneke
Excellent read clear and concise. Helpful for me for sure! I’m looking forward to additional articles
———
CKAero replied:
Thank you Gary!
Billy J Meadows
Brett,
Are you sure about your “upwind lift” concept.
Billy
———
CKAero replied:
Hey Billy,
Thanks for the feedback! I pulled the following from the FAA Airplane Flying Handbook:
“Wind acting on an airplane during crosswind landings is the result of two factors. One is the natural wind, which acts in the direction the air mass is traveling, while the other is induced by the forward movement of the airplane and acts parallel to the direction of movement. Consequently, a crosswind has a headwind component acting along the airplane’s ground track and a crosswind component acting 90° to its track. The resultant or relative wind is somewhere between the two components. As the airplane’s forward speed decreases during the after landing roll, the headwind component decreases and the relative wind has more of a crosswind component. The greater the crosswind component, the more difficult it is to prevent weathervaning. … While the airplane is decelerating during the after-landing roll, more and more aileron is applied to keep the upwind wing from rising. Since the airplane is slowing down, there is less airflow around the ailerons and they become less effective. At the same time, the relative wind becomes more of a crosswind and exerting a greater lifting force on the upwind wing. When the airplane is coming to a stop, the aileron control must be held fully toward the wind.”
While I do appreciate the fact that a crosswind does not cause the airplane to roll in a steady state, unchanging scenario, this section was intended to highlight the rolling effect of an uncoordinated airplane in a crosswind. This is true on the landing rollout as the airplane flying handbook talks about and also true on the final approach as you slow down and necessary crab angle changes. I will talk more about crosswind landing techniques in part two as well and this is the basis for aileron into the wind as you rudder away from the wind for the upwind wing low sideslip technique.
Any gusts in crosswind conditions will predominantly cause this effect as well.
Hope that makes sense! Don’t forget that my objective is to present everything in a manner that is relevant to modelers so I may stumble on some technical inaccuracies from time to time but I promise the practical advice is sound :)
(for anyone else reading Billy is a professional pilot himself who had a long and illustrious career with the FAA)
Thanks for the comment!
Frank Iacobellis
As a full scale pilot and a pattern pilot I try to use a standard approach starting my descent abeam the end of the runway then turning base with a 45 degree to the wing descending at a steady rate and cutting the throttle to idle only when over the end of the runway.
———
CKAero replied:
That’s a great technique, Frank! Just about anything you can do to standardize your approach and landing is a good thing!