Introduction
A rolling circle is one of the most beautiful maneuvers that can be flown in precision aerobatics. This intricate dance involves rolling an airplane while turning through a full circle, resulting in a mesmerizing display of control. While most people find rolling circles impressive to watch, they are also incredibly satisfying to perform. The precision and skill required to execute this maneuver flawlessly make it’s successful completion a nearly unparalleled accomplishment worthy of pride and praise. In this article, we will explore what a rolling circle is and the precision criteria we use to judge them, why you might care to fly them yourself at all, the theory we use to understand them, practical advice on how to get better at them, and some bonus tips to help you master them. Whether you're a seasoned precision aerobatics competitor looking for an edge or a sport flier looking to impress, I believe you can benefit from the wisdom I’ve earned flying rolling circles in precision competitions all over the world over the last 15+ years.
Outline
What is a Rolling Circle?
Let’s start with the basics.
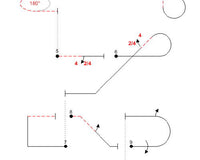
A rolling circle is just as the name suggests. You are flying a 360° circle in the horizontal plane but rolling while you are doing it. This can have broad interpretations depending on the context in which it’s performed but in precision aerobatics we have some specific criteria that determine a perfectly flown rolling circle. To give you a visualization, here are a few examples from a few of the best pilots in the world:
Christophe Paysant-Le Roux, 9 Times F3A World Champion, flying a ½ roll “out”, opposite ½ roll “in”, rolling circle in F-23
Juan Rombaut, Spanish F3A Champion and a F3A World Championship Finalist flying a rolling circles with 4 rolls, rolling to the outside
🎯 What Makes for a Perfect Rolling Circle?
These are the criteria we shoot for to get a perfect 10 on a rolling circle:
- Consistent altitude throughout the maneuver
- Start and end at “center” (directly in front of the pilot)
- Consistent circle radius (creates a perfectly round circle as viewed from above)
- Consistent roll rate throughout the entire maneuver
- Rolls are evenly distributed throughout the circle element
Using these criteria as a guide, there are actually several ways we can build different types of rolling circles in the sequence. Get familiar with this terminology and you may be able to impress your buddies at the field next weekend 😉
Rolling to the “inside” versus rolling to the “outside”
The “inside” and “outside” terms reference the turning direction compared to the rolling direction. If the airplane is turning (as viewed from behind the airplane) in the same direction it is rolling, then we say the airplane is rolling to the inside. Conversely, if it is turning in the opposite direction it is rolling, then we say the airplane is rolling to the outside.
So, if we are flying left to right in front of us and start a rolling circle going away from us, then the airplane is turning left. A left roll would be to the inside and a right roll would be to the outside. The only consideration is turning direction compared to rolling directione. We do not care if the airplane is upright, inverted, or on knife-edge.
“Coming in” versus “going out”
In precision aerobatics we always fly a base line parallel to the flight line. Therefore, we have two options when we do a rolling circle. We can either bring the model closer to us by turning the circle towards ourselves, aka “coming in”, or we can “go out” and start the turn of the circle away from ourselves. In precision aerobatics most of us decide to do a rolling circle “going out” because of how it presents to the judges. When you’re flying a rolling circle for fun it is often more satisfying to “come in” because the model is closer to you! That’s usually more impressive 😎
Different numbers of rolls
Our criteria is only that the rolls must be evenly spaced throughout the geometry of the circle. Rolling circles can have any number of rolls you can think of but it is most common in competition to see 1-roll, 2-roll, and 4-roll rolling circles.
Reversing roll direction
It is common to see reversing roll directions in rolling circles in F3A competition. These are especially difficult not only because you must change your rolling direction, but also because you are switching from rolling to the inside to rolling to the outside, or vice versa. As we’ll discuss later, rolling inside versus outside presents different challenges. In F3A we must have an immediate roll reversal.
🤔 Why Fly Rolling Circles at All?

Like Bilbo, I mostly just don’t see a reason not to!
In all seriousness, rolling circles are some of the most beautiful and impressive maneuvers to witness when they are done well. Most of us have decided to pursue precision aerobatics, or at least the improvement of our skills if not our competition scores, because we watched someone who inspired us at the flying field. Rolling circles have that power to inspire. A perfectly executed rolling circle is an awesome sight and ultimately one of the most satisfying things we can learn to do in aerobatics. I strongly believe it’s important to keep that spirit alive in us and to not get too bogged down in only flying the sequence day after day. This is how we motivate ourselves to be better and how we excite others who may be interested in precision aerobatics. Juan Rombaut's YouTube channel is full of tons of this inspirational content for the aviation lover in all of us and I encourage you to check it out.
Do it because you love to!
Theory of Rolling Circles
Theory? What theory? Roll the dang airplane and make it go in a circle! What’s the big deal?!
While it may be tempting to jump headlong into the abyss, I prefer a more measured approach. Let’s take a minute to discuss the mental framework we use to approach the rolling circle and discuss some basic aerodynamics at play throughout the maneuver.
🧠 The Mental Framework
A rolling circle is essentially two maneuvers combined, a roll and a turn.
A roll is done around the longitudinal axis of the airplane (tip to tail) and we have to make elevator and rudder inputs to keep the airplane flying level.
The need for inputs throughout a roll to keep an airplane flying level is fairly self explanatory and so we won’t spend much time discussing this. I will only mention that rudder is required!
A turn is a maneuver we learn before any other. We usually accomplish this by rolling the airplane slightly into the direction of the turn we wish to make and inputting the appropriate amount of up elevator to maintain level flight.
However, in a rolling circle the turn is not only done with up elevator. Because the airplane is constantly changing attitude, we must constantly change the turning input to keep the airplane tracking around the circle in our turn. If we are wings level (upright or inverted), our turning input is purely rudder. If we are on knife-edge, our turning input is purely elevator.
The turning inputs are where the magic lies, and they are perhaps a little trickier than you may think. This is due to the nature of what I call transitional lift, which we talk more about below.
🍃Aerodynamics in a Rolling Circle
Yaw Authority vs. Pitch Authority
The first consideration is yaw authority versus pitch authority. I think most will understand this concept – your rudder is not as powerful as your elevator. This is because the wing is a much more powerful lifting force than the fuselage. For the same lifting effect (to keep the airplane flying level for the rolling element of our rolling circle) or turning effect, we need more rudder compared to elevator.
Transitional Lift
This knowledge is used in conjunction with the concept of transitional lift to fully understand our required inputs for the rolling circle. Transitional lift describes the transition of the lifting force from the wing to the fuselage and back again throughout a roll. It would be tempting to think that the transition from lift on the wing to lift on the fuselage is linear, but it is not. This lift transition actually roughly follows a sinusoidal wave. OK, don’t panic – no one wants a lesson in trigonometry – but stay with me.

The change in lift we experience throughout a roll roughly follows a sine curve because our change in effective wing area also follows a sine curve.
From betterexplained.com
Look at the following table to see this graph contextualized for our uses. Note that the Angle of Bank column is in 15° increments but the Loss of Wing Lift dramatically increases after 30°, and especially after 45° of bank.
| Angle of Bank | Loss of Wing Lift |
| 15° | 3% |
| 30° | 13% |
| 45° | 30% |
| 60° | 50% |
| 75° | 75% |
| 90° | 100% |
You can see this yourself if you do a quick experiment the next time you’re at the flying field. Roll the airplane to various positions, then take your hands off the sticks and see how quickly it falls. At 30° of roll it will hardly fall at all, at 45° of roll it will be noticeable but not drastic, and angles 60° and more of roll the airplane will feel like it's totally falling out of the sky (assuming a fairly standard aircraft design).
*Disclaimer for the aerodynamicists reading: Like most things in aerodynamics, I know the actual reality of how lift changes while the airplane rolls is much more complicated. I don’t presume to have a comprehensive academic understanding of the concept, but I do have a comprehensive practical understanding and enough knowledge of aerodynamics to make a rational connection.
Keep this concept of transitional lift in mind when we start talking about how to actually perform the maneuver.
Ground Speed vs. Air Speed
It’s important to understand the difference between the speed of the airplane over the ground and the speed of the airplane through the air. In RC precision aerobatics, for judging purposes, we are only concerned with the speed of the airplane over the ground. For the geometry and roll rates to remain accurate and consistent, we must have a consistent ground speed throughout the entire maneuver. This means, if there is any wind, our speed through the air must increase in a headwind and decrease in a tailwind. As our airspeed increases, our control effectiveness increases, so we must adjust our inputs accordingly. The opposite is of course true as our airspeed decreases.
Yaw Effects Change with Roll
We often set up knife-edge mixes to keep our airplane tracking straight and true on a pure knife-edge and then assume it will keep our airplane yawing purely in all attitudes and conditions, but this is not the case. This is a big reason why it’s very important to have an airplane that yaws as purely as possible without mix but it is deceptively hard to accomplish. Bryan’s Triangulation Trimming is the only way to consistently accomplish this that I know of.
When you are not on pure knife-edge you can usually expect some “pro-verse”, or same direction, roll. This is at least partially due to the airplane being put into a skid. The outside wing in a skid is producing slightly more lift, which induces a roll. You can find a great discussion on the topic here just realize that many of the factors that affect a full scale airliner are designed out of our aerobatic airplanes.
Putting Theory into Practice
As we discussed previously the rolling circle is really two maneuvers combined, a roll and a turn. Before we go any further, it’s important that you have your roll inputs well practiced and consistent. It goes without saying that if you’re practicing rolling circles, the rolling part should be down pat first! This includes the use of rudder and the ability to slow roll from one end of the box to the other.
I will also note the importance of having as good of an airplane setup as you are able to create. Pure behavior in all axis is critically important when the airplane is steadily moving through all axis at once! Our Basic Aircraft Setup article is a good place to start and when you have that mastered, move on to the study of Triangulation Trimming.
OK – now the good stuff.
Here’s the thing… If you can roll your airplane from one end of the box to the other, you can do a rolling circle. Most of your practice should probably be just that – perfecting your slow roll. Once the slow roll is nailed, you just have to add in the turn.
The turn can be approached and practiced in a couple different ways. I will advocate for what I call the 4-point method.
4️⃣ The 4-Point Method
The 4-Point Method is the best way I think you can approach learning a rolling circle based on my experience competing at the highest levels for almost 20 years now. If you read some of the other articles out there many advocate for what I consider a sort of half-baked approach – that is, they primarily focus on “surviving” the rolling circle by using things like a slight pitch up before you start the circle, only using elevator to do the circle in the beginning, starting off with a 90° section, or some combination of these. In my opinion, it’s critical to include all of the necessary inputs from the beginning so you build the habits in your fingers needed to execute the maneuver properly.
So, with that in mind, here it is in a nutshell:
- You will start by practicing a 1-roll rolling circle to the outside
- You will perform a 4-point roll in the circle to start instead of one smooth roll
- You will do a full 360° circle from the beginning
That’s it.
I want you to start with a 1 roll rolling circle because the turning inputs happen at a slower pace and rhythm. We are building up the necessary habits for you to execute that rolling circle at any pace and with any number of rolls, but as with anything else it’s always easier to go slower at first.
By executing a 4-point roll in the circle you get to compartmentalize the rolling inputs and the turning inputs. With that in mind, let’s run through what it will look like to do your first one:
- As you approach center in the box you will be upright, wings level.
- At center (actually a hair before center if you want to be perfect), input rudder in the direction of your desired turn and do a flat rudder turn for about 30° of your circle (it’s not important to be precise in this regard). Pay close attention to how the airplane behaves in yaw. Do you have to manually input opposite aileron, or up elevator, or something else to keep the airplane in a level flat turn? If your airplane is perfect you don’t have to do much of anything but most people don’t have perfect airplanes!
- Roll 90° in the opposite direction of the turn (“to the outside”) and push down elevator to continue the turn. Remember our goal is to be on knife-edge at the 90° point in the circle, tracking perpendicular to the flight line. Make sure you hit that checkpoint!
- Once you are through the first 90° point in the circle, roll another 90° to inverted and input rudder to continue the turn. Because you are now inverted, that rudder input will actually be opposite the direction of your turn. You will stay inverted, using rudder to do an inverted flat turn through the 180° point in the circle.
- Continue the 4-point roll and turning inputs through the rest of the circle, doing the final point back to level before you finish the circle and completing the radius back to center in another upright, level flat turn.
As you practice a 1-roll rolling circle with this method over and over, you can gradually slow down your roll rate, shorten the time you stay on each point, and learn to blend your rolling and turning inputs throughout the entire maneuver. And then, on one magic pass, you will feel comfortable enough to remove the points all together. As the airplane comes around the final bend you’ll feel the thrill of accomplishment, in awe of that perfect rolling circle that, as it turns out, was flown by you! There’s nothing better!
You can see the whole progression through these 4 short clips in Real Flight I've created
As you learn to blend turning and rolling inputs, keep the concept of transitional lift in mind. Because of transitional lift and the fact that the wing is a much more powerful lifting mechanism than the fuselage, you will learn to lean on the elevator more than (but not exclusive of) the rudder for the lion share of your turning throughout the circle.
Once the 1-roll circle is understood and the inputs are ingrained in your head, you can start experimenting with some variations to challenge yourself further. You can roll to the inside instead of the outside, do a 2-roll or 4-roll rolling circle, incorporate roll reversals, fly a rolling figure 8, fly 90° or 180° portions, and a whole lot more. They are all fundamentally the same two combined maneuvers – a roll and a turn.
Get to work!
❎ Common Errors
- Stopping the roll in certain spots of the circle and inputting all of the circle “turning” inputs at once
- Not using the rudder to keep the airplane turning through the circle while the attitude of the airplane is upright or inverted
- Missing intermediate roll check-points throughout the circle
- Higher altitude at the back of the rolling circle versus the front
- Varying roll rate, especially on rudder input when the airplane is at the 45° roll position
- Second half of the rolling circle is pinched and smaller than the first half
Bonus Tips
Rolling circles definitely follow the classic 80/20 rule – that is, the last 20% of the endeavor takes 80% of the effort. Mastering the rolling circle in all of its forms is a never ending pursuit. In my opinion, that’s the best kind! Keep these tips in mind as you work on that last 20%.
- You should be able to fly a rolling circle on whatever rate you would fly a slow roll on. You will need to maintain a consistent, perhaps exceedingly slow rate of roll so keep that in mind
- Envision the next rolling checkpoint in your rolling circle - always be planning ahead
- Don’t fly mechanically — which means you sometimes have to be reactive. Why is this?
- Things are moving so slowly — rolling slowly, small precise changes to elevator and rudder — that turbulence or unexpected aircraft behavior (usually related to imperfect KE behavior) can have a proportionally large impact on the attitude of the airplane
- This is another reason you need to always look ahead to the next checkpoint, evaluate current progress, and adjust inputs
- Knife-edge mix and/or odd knife-edge behavior of your model can cause a lot of issues in your rolling circle, especially the slow rolling variety like a 1 or 2 roll circle
- Take time to figure out how your model behaves with yaw at odd roll angles
- Steady roll rate means that you must keep the same ground speed throughout a rolling circle! If it is very windy, this means large changes in power to keep a steady ground speed and therefore big changes in the amount of control required to perform the rolling circle.
- Don’t forget about the concept of transitional lift and using your elevator as the primary driver for the turning element
Good luck and enjoy yourself.
Until next time… remember to fly with purpose!
Brett