
Introduction
When we’re learning to fly we quickly learn about the idea of “rates”, or the ability to control the amount of throw we have available to us via switches. When transmitters with rate switches first came out your only option was to use the predefined rate switches for elevator, rudder, and aileron. As transmitters became more capable, the ability to select which switch you wanted to use for these rates was all the rage, but now we have ultimate control over every single facet of programming with modern radios. We can create conditions, complicated logic switches, activate rates and conditions with stick movement, program complex, multi-point mixes and more. So many options!
What do we do with all this choice? How do we make sense of what switch to use where, and at what time?
Many of us default to what we learned in the beginning and we set up 3 rate switches. One is for elevator, one is for aileron, and one is for rudder. The throttle is used the same way throughout the sequence so that is left alone and the other three primary flight controls need a method of adjustment. It makes sense!
Or… does it?
Others have embraced the technological revolution and decided the transmitter can do all the work for them. They endeavor to never flip a switch the whole sequence despite their implementation of a different rate/expo/mix combo for just about every maneuver upright, inverted, upwind, downwind, left, right, and with their eyes closed. These guys love to show you their setup!
“See I just go past 72% up elevator and it activates my snap condition but the aileron doesn’t come in until I get past 83% left aileron or 85% right aileron (because of course, we have to compensate for the spiraling slipstream!), then the throttle increases 500 rpm and all of the expo goes away. When I let go of the sticks the aileron is programmed to be 15ms slower on the way out for the perfect exit and the rudder is mixed to the elevator to keep the airplane on the flight path. Isn’t it great?!?”
This group is full of bonafide geniuses I can’t keep up with, let there be no doubt. But… are the conditions and attitudes we fly in so consistent we can leave it to a computer program to do the flying for us?
Below, we’ll take a closer look at a few of these basic switch philosophies I’ve seen implemented in the last 18 years I have been competing in precision aerobatics. We’ll discuss why I think most of them are fundamentally flawed in their thinking and I will make the case for my Targeted Approach which leverages the power of the programmable transmitter to empower you to fly more consistently without taking away the critical component of your involvement and decision making.
Outline
Actually — More Expo, More Problems
This is How I’ve Always Done It
The Way You’ve Always Done it is No Good
This Program Doesn’t Mean You Can Check Out
Situational Awareness
Your Transmitter is a Tool Worthy of its Own Attention
Implementing the Targeted Approach to Transmitter Setup
The Quick and Dirty
No Switches, No Problems
This is the ‘one rate for everything’ philosophy. The “one size fits all” methodology that says ‘switches ARE the problem’. In the context of precision flying, this means the following:
- Snaps rolls (~27° of aileron throw) and slow rolls (~5° of aileron throw) must be done with the same rate
- Stall turns (full rudder deflection ~45°) and fine yaw adjustment (1-2° corrections) must be done with the same rate
- Spin entries (up to 20° of throw) and sustained inverted flight (1-2° of throw) must be done with the same rate
The obvious solution for this complication is the generous application of exponential, or expo.
When we first are learning to fly expo is the magic genie that fixes our inevitable over controlling habit. I can tell you as a full scale flight instructor myself that this phenomenon seems to be hard coded into our brain. It’s an issue that most new pilots, full scale or RC, encounter. To correct this in a full scale airplane I teach students to ‘fly with their fingertips’ and to learn to use power changes and elevator trim to do the heavy lifting of aircraft control.
In RC we operate in a totally different aerodynamic envelope, and we’re already flying with our fingertips! Most do not have the physical ability to control the transmitter sticks more precisely so we rely on expo to soften that middle zone where we need to make small corrections.
This seems like the simple, no nonsense solution that should solve our problems at first – set the max throws where they need to be for the most demanding parts of the sequence and then use expo to make fine control possible. Not having the distraction of flipping switches throughout the sequence is enticing — but here’s the rub.
Actually — More Expo, More Problems
As we’re all aware, an expo curve looks something like the below image.

Stick movement is on the X axis while control throw is on the Y axis. When we require large amounts of expo we get what many refer to as a knee in the expo curve. This means that at some point, the expo will catch up with you and with a very small movement of your stick, you will get a relatively large amount of control throw movement.
If you’re a proponent of the “one rate fits all” approach, the effects of this knee in the expo curve are unavoidable. In precision aerobatics we need to precisely place our control surfaces at small amounts of throw, large amounts of throw, and all the positions in between. So, here’s what happens:
- Inconsistent roll rates are prevalent throughout the sequence
- The flight presents ‘mushy’ throughout. It tells the judge you are not in total control, is downgradable in its own right, and makes it exceedingly difficult to be consistent
- It’s physically impossible to be as accurate in your airplane control as it is with other methods. We are trying to now cram 30° or more of control throw into the same area of physical stick movement.
If you use a big transmitter tray or tall sticks to combat the problem instead of expo, the result is the same.
This old adage fits this philosophy perfectly:
“Jack of all trades, a master of none”
This is How I’ve Always Done It
Perhaps the most common setup is the one we all learned in the beginning. This is how most sport flyers set up their radios so it is logical to carry this setup over into the realm of precision aerobatics. It’s the “one switch, one change” methodology where there is a switch assigned to change the rates of a single control surface and nothing else.
This means one switch controls the rudder, one switch controls the elevator, and one switch controls the ailerons. Now we don’t have to worry about that pesky expo knee! This is a step up from the “one rate to rule them all” methodology we discussed first, but there are some issues we have to face
- Some maneuvers require changing two, or even all three rates to perform the maneuver as intended. That’s a lot of switch flipping! This makes us prone to errors and distraction.
- It can be very difficult to remember what maneuver needs to be done on what rate. The switch corresponds to the amount of throw and not to the maneuver, so memorization and recall has to be performed in the middle of your flight to accurately hit the correct switches. The internal conversation goes something like, “OK this snap is mid-rate rudder, high rate aileron, mid-rate elevator. Bam! Phew. OK stall turn now, low rate elevator, mid-rate aileron, high-rate rudder. But wait, did I want mid-rate elevator? Dangit I just flopped that stall turn!”
- Assigning a control surface to a switch artificially limits you to 2 or 3 rates for that control surface, depending on the number of positions of that specific switch on your specific transmitter.
- Sometimes a rate switch is put in an inconvenient spot. Do I really want to be reaching for an elevator rate switch above my elevator stick as I’m slowing down for a spin entry? (the answer is an emphatic NO!) One switch is being used across multiple maneuvers so it’s very difficult to find a spot for that switch that is always convenient and not disruptive to get to.
Dang, this switching rates stuff is complicated!
The Way You’ve Always Done it is No Good
At least, not for precision aerobatics.
A lot of you figure this out and decide to change your approach. So many mistakes were made in the flurry of switch flipping that you decide to get rid of those dang switches all together! So, time to have “One rate to rule them all!” Or, you think, maybe I can get the programming to do the heavy lifting for me…
Checkout this Program
This one is for our programmers, engineers, whiz-kids, and nerds. I can say that because I’m a big nerd myself! I love getting into the weeds on what a transmitter can do for me. I love technology! The ability of any well executed piece of technology to leverage our ideas, abilities, and inputs is nothing short of awesome. However, technology should be used as a means to an end and not an end itself. It’s a tool with unparalleled power. As the timeless philosopher Uncle Ben tells us,
“With great power, comes great responsibility.”

And some of you (you know who you are) have thrown caution to the wind and embraced your new-found technological power with the excitement and fervor of a bitcoin investor. Unsure of where it’s all headed, your charge full force into the great unknown enthused about the potential for world-bending progress. But just like your neighborhood bitcoin guru, if you don’t know when to stop you’ll be left with a big pile of code and nothing to show for it.
We must keep the goal in mind through all of our setup efforts – higher scores! Programming can become overcomplicated to the point where you are attempting to remove too much of yourself from the process. Your full attention, focus, and involvement in a successful precision flight is not only necessary, it’s key!
This Program Doesn’t Mean You Can Check Out
You know you’ve gone too far when the following considerations apply:
- In the course of a flight you cannot say with 100% confidence what changes are being made to your rates, expos, and mixes 100% of the time.
- You’ve programmed stick switches, control surface movement speeds, complex mixes, or other methods to replace the need for you to make a physical movement on the transmitter sticks.
- You have separate rates set for every conceivable way a snap can be done in an effort to not have to be so good at timing your stick movements. These rates are all on stick switches and logic conditions.
- You are deathly afraid to change your prop, your CG, your thrust, or anything else that can affect the whole flight envelope because it means you’ll have to spend another 2 months setting up all 57 rates you had just perfected.
There’s a better way.
I call it the Targeted Approach.
The Targeted Approach
The goal of my Targeted Approach is to leverage the power of the transmitter, empowering you to fly precisely and consistently throughout the entire flight envelope.
To achieve this goal we must keep these things in mind at all times:
- The pilot must maintain situational awareness throughout the entire flight
- The transmitter is an essential tool worthy of attention in its own right, just like the airplane itself
Situational Awareness
Situational awareness is a term I’ve lifted from my experience in full scale aviation, but the concept is used across a variety of industries and disciplines. In general terms, it means the following:
The perception of the elements in the environment within a volume of time and space, the comprehension of their meaning, and the projection of their status in the near future
For our purposes situational awareness simply means you know what’s happening now and what’s about to happen with you and your aircraft.
This is vital so that we can be proactive instead of reactive.
Your Transmitter is a Tool Worthy of its Own Attention
Transmitters have come a long way since they first replaced a few pieces of string attached to a handle. While the “string” has been replaced and the “handle” now boasts more processing power than the space shuttle, it still has the same fundamental purpose. Your transmitter is the interface between you and your airplane. It is the sole method by which you communicate to and control your aircraft.
In full scale aviation there are entire bodies of academic research dedicated to flight controls, cockpit design, and the way in which a pilot interfaces with those things called human factors. In RC we typically gloss over the importance of this interface. We routinely hop between transmitter brands, place rate switches “where they’ve always been”, and hardly consider what kind of rate switches we should be using in the first place.
We must remember, especially considering the power of the programmable transmitter today, that your transmitter setup is every bit as important as your airplane setup. In addition, to get the most out of that transmitter, you must practice operating it the same way you practice your sequence.
With those things in mind, we can talk about the implementation of the Targeted Approach. Here are the rules you should follow to implement the Targeted Approach yourself.
Implementing the Targeted Approach to Transmitter Setup
Each maneuver element with unique aerodynamic requirements will have a physical position switch dedicated to that maneuver element on your transmitter
A “maneuver element” describes a fundamental building block of a precision sequence. We learn when we first start competing in precision aerobatics that all of our maneuvers are just a combination of the main building blocks of lines, loops, and rolls. We will be more specific than these three but the idea is the same. A maneuver element can be a sequence maneuver in and of itself but is also used in combination with other elements to create larger and more complex sequence maneuvers. I’ve listed a few examples of maneuver elements below:
- Takeoff
- Landing
- Non-rolling loops
- Horizontal rolls
- Slow rolls
- Snap rolls
- Spins
- Stall turns
- Rolling circles
- Rolling loops
- Knife edge loops
Do we need a switch for each of these? No! We only need a physical position switch for the elements that have unique aerodynamic requirements. This means to perform that maneuver you have to demonstrate control through a unique portion of the flight envelope. We can define the flight envelope as the performance limitations of the aircraft design as it relates to airspeed and angle of attack (AOA). A deeper dive on angle of attack can be found in Earl Haury’s great Anatomy of a Snap Roll article if you have questions about what that means.
Long story short, we need a switch for each maneuver element which puts the airplane at unusually high or low airspeeds, and at unusually high AOA’s.
Low airspeed and high AOA? That describes a spin.
High airspeed and high AOA? That describes a snap.
Low airspeed and low AOA? Welcome to what we call a stall turn.
The amount of maneuver elements with unique aerodynamic requirements you have in your sequence will increase as the complexity of the sequence increases. These are the different elements I have setup on my transmitter. This allows me to fly unknown sequences in F3A (this is as complicated as it gets).
- Normal flying (includes rolling circles and rolling loops)
- Snap roll
- Spin
- Stall turn
- Knife edge loop/part loop
- Landing
Switches should be tied to flight modes (also called conditions) and not single rates
Remember that the goal of the Targeted Approach is to leverage the power of the transmitter while always keeping you in total control. The best way to do this is to have that switch targeted to the task that you must perform and not to the tool (i.e. rate) you use to perform that task.
Because we may want several changes to take place at once, and because those changes may necessitate things like different mixes or throttle curves, it makes the most sense to assign each maneuver element a flight mode or condition in your transmitter. Each brand has their own terminology but they are essentially the same thing: a “container” of sorts in your program where you can put several rate changes, mixing changes, and system level changes you cannot make with just a simple dual rate.
These conditions should always be activated by a physical, multi-positional switch. We are talking about the toggle switches on your transmitter and not the sliders, knobs, or sticks themselves. The reason for this is to keep you in the driver’s seat. Activating a condition with an ambiguous position of a switch, knob, lever, etc. puts doubt in your mind while you’re flying. There is no room for doubt! We must keep our minds clear and the connection to the airplane absolute for our best performance in competition.
Switch position should not interfere with primary controls for that maneuver element
To empower you to fly your best we must keep you in the driver’s seat at all times. It’s essential that you have total awareness of what rates and programming changes are happening in real time. This allows you to stay mentally connected to the airplane with a feeling of total control throughout the entire sequence.
Part of staying in control is ensuring that when you go to flip a switch it doesn’t negatively interfere with the necessary stick movements you will have to execute before the maneuver. For instance:
- You will be getting into the elevator as you slow down for a spin entry
- Throttle should be constantly changing and perhaps fine tuned before a stall turn
- You’re very likely to be fine tuning an elevator input before a snap
- Knife edge elements will of course be done on the rudder
We must strategically place a switch so as to not interfere with the manipulation of these “primary controls” before a maneuver element. Because each switch is targeted to a specific maneuver element, we can almost always effectively choose a switch position that does not interfere with the necessary movements we must make on the sticks.
This becomes a major benefit of the Targeted Approach when you consider the difficulty of reaching for the same rudder rate switch before a stall turn and before a snap. If you target a control surface instead of a maneuver element you are almost certainly putting yourself at a disadvantage at some point in the sequence.
Your programming scheme should be written down in a quickly digestible format so that you always have total visibility and understanding of your program
Your transmitter program should constantly adapt to changes in aircraft setup, environment, and preference. Imagine after practicing for a month you experiment with moving your CG rearward because you just can’t nail down your rolling elements. The only problem is, this affects your preferred elevator feel inverted, snap rates, spin entry, how much throttle you may need to use in a stall turn, required knife edge mixes, etc. The list goes on! If you do not have an easy to read and complete view of all of the rates and mixes in use throughout the sequence it is very easy to quickly lose track of what changes you made where, which rates affect which maneuvers, mixes in use system-wide or just condition-wide, expos, and all the rest.
Flexibility in your setup is a key component of competitive success. For example, if CK Aero comes out with a prop that suits your flying style perfectly or you buy some of our proprietary tools and fix an alignment issue on your airplane, you will have to reevaluate the entire flight envelope! Writing everything down gives you a record to reference as you decide to make changes to your program because of these enhancements you’ve made along the way.
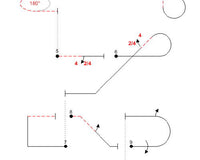
It doesn’t have to be fancy or difficult! I’ve included a template you can use to keep track of your programming scheme below (click the image to download a printable PDF) but feel free to make your own to suit your needs or program a little better. Consider this a starting point. Note that I've intended that you print out one page per flight mode/condition in your radio. A "sub-set" refers to a more specific version of a maneuver element. For example, you may want different rates for an upright spin versus an inverted spin. You could put the details of your inverted spin rates in the "Sub-Set #1" area.

The Quick and Dirty
The goal of my Targeted Approach is to leverage the power of the transmitter, empowering you to fly precisely and consistently throughout the entire flight envelope.
To achieve this goal we must keep these things in mind at all times:
- The pilot must maintain situational awareness throughout the entire flight
- The transmitter is an essential tool worthy of attention in its own right, just like the airplane itself
Follow these rules to implement the Targeted Approach:
- Each maneuver element with unique aerodynamic requirements will have a physical position switch dedicated to that maneuver element on your transmitter
- Switches should be tied to flight modes (also called conditions) and not single rates
- Switch position should not interfere with primary controls for that maneuver element
- Your programming scheme should be written down in a quickly digestible format so that you always have total visibility and understanding of your program
Practice Makes Perfect
For many of you reading the Targeted Approach may represent a whole new paradigm by which to approach your flying. It must be appreciated that using your transmitter to its full ability is akin to learning to fly your airplane to its full potential. Both elements require practice to perform at your absolute best. Here’s the thing – there is just too much you are leaving on the table with an oversimplified or under-considered transmitter setup!
Consider how hard you work on perfecting that cornerstone maneuver of your pattern. It may be a rolling combination, a snap, an integrated roll, a knife edge loop, or anything in between. We all have that maneuver we work and work on because it continues to kick our butt!
Now consider that the improvements you can make on this one maneuver only represent at best a 2-3% improvement on your overall score.
Practicing the programming and physical operation of your transmitter will level up your entire flight from beginning to end. You may also consider how a well executed and practiced programming scheme can help prevent those nasty zeros on flopped stall turns, botched spin entries, and snaps. I cringe a little bit when people tell me they just can’t flip switches during their sequence. To me, that’s a clear sign you need to practice using your transmitter effectively!
The Targeted Approach represents, in my opinion, the most effective and robust way to leverage the power of that transmitter for your benefit. It may in fact be the single most important thing you could do to improve your performance, your airplane, and your enjoyment of this great hobby.
Let me know what you think down below!
Brett


6 comments
Rick Sweeney
Brett,
You have me re-thinking using stick position for activating my snap condition. Your comment concerning (awkward jump in your control surface movement) I had never considered. Using a switch for snaps always seemed awkward for me as you have to get on and off the switch so quickly for a maneuver such as a Pyramid loop with a snap on the bottom. By the time I turn the bottom corner, hit the snap rate switch, I’m past center and late on the snap, then fumble to turn the rate switch off before having to perform another corner. I have my condition trigger set up so that 98% ail and 98% elv are required before activating the snap condition. This way I am not fumbling with the switch in such close quarters. Having said that, not all snaps are placed in fast paced elements of a maneuver. Your comment about that awkward jump has me thinking this might be throwing off my timing at times and causing less consistency on my snap exit’s, I think its time to do some switch testing for snaps. Good article, many thanks.
Rick Sweeney
———
CKAero replied:
Thanks for the comment Rick! I would suggest that you may just require practice efficiently and confidently flipping that switch before and after your snap. Don’t discount the value of learning how to physically operate the transmitter effectively. Maybe a tray or another supporting device would help (it did me). Maybe a different switch on the transmitter would be easier to flip or maybe you could put a rubberized switch cover on your snap switch if you don’t have one already (there is a large selection available on Amazon).
Good luck!
Brett Wickizer
Thanks Joseph! Good luck and if you need any advice, feel free to send an email my way Brett@CKAero.net
Joseph Macias
Great reading Brett. I’ve been building and flying since the late 70s. Radios were very primitive it wasn’t till 1980 when I bought a futaba radio system that had dual rates and that’s it. So I used dual rates during take offs and landings only. I called it balls to the wall flying and flew well now I use a Spektrum and still use just dual rates but I’m going to make it a mission to use more of the radio’s capabilities and hope to get help from fellow club members for help.
Brett Wickizer
Thanks guys!
1. I believe stick switches, in most cases, provide too much ambiguity on the activation point and therefore detract from your “situational awareness”. I tried to address this in the article although I may not have been explicit. There are perhaps some exceptions but they are edge cases (I actually use a logic function [toggle switch and a stick switch] to activate a downline snap rate). 2. I would be happy to learn how you do it and you may teach me something new, but from what I’ve seen by using a stick switch in this way you are removing your own agency. Remember that I am advocating the Targeted Approach to empower the competitor, which means you have to perform (read: practice!). When you have a stick switch activate the snap rate the activation point causes an awkward jump in your control surface movement and removes some ability for you to make small adjustments to your inputs for the perfect execution.Dan,
My opinion is that any condition, including your snap condition, should always be activated with a toggle switch. There are two main reasons:
Hope that makes sense. Would love to hear more about how you do it!
Dan Underkofler
Nice article Brett!
You didn’t directly address the very common practice of using stick switches and logic to trigger the snap condition. Thoughts?
Doug Bracey
Great article Brett