
This article is written by CK Aero Founder Bryan Hebert
Trimming an aerobatic aircraft is like learning the game of golf. When you first start out, the game seems fun. You have some good strokes and some good holes, but some call it beginners luck! Then, as you get a little more serious and buy better equipment, you race out to the course to play 18 holes every chance you get. You quickly find out how much you don’t know about the game. Every time you try to get a better score, you seem to go backwards. Most eventually quit, some hang on for a few years and play to hang with the guys and drink beer, some really get entrenched and read everything they can get their hands on about golf, try every new fad, and watch their favorite pro whip a sweet swing at the latest golf tournament on TV. These last few are inspired by how effortless the pro`s make the game look. Even though they will never achieve that perfection, they know it’s possible. This little bit of inspiration keeps them playing till the dedicated get their scores lower. I hope I`m talking to these dedicated few who want to learn and are willing to put the work in for our wonderful sport of Precision Aerobatics. This article is aimed at the Entry to mid-level pilot looking to up his game and make foundational improvements.
So, you’re a good sport pilot, maybe the local pro at your club and you’re tired of boring holes in the air and hucking around the runway. You want more reward and discipline, so you decide to try your hand at pattern. Where do you start? And where can you read about how to participate and get involved in precision Aerobatics?
To start, buy an entry Pattern plane new or buy a second hand air frame that’s been on the contest circuit for a while. Only then, will you realize this sport is harder than it looks! So you ask yourself, where can I go to read up and learn about the sport? How do I know my airplane is set up correctly? Your efforts at flying precision are frustrating, yet obsessive, and you want to improve your skill. Where do you start?
The very first thing you may need to start this journey is a friend who can help with basic setup. This is important and can be frustrating as well; from getting the Center of Gravity set correctly to setting the throws for your skill class. Let the local pattern pro give it a good look over; let him fly it and help set the radio up for your best results. If you have an airplane that behaves correctly for your class and you are satisfied with the way it handles in most conditions, you are in good shape! If you struggle to keep that ship flying in the direction you pointed it, a seasoned competitor can give you good help and put you on the right path. If you don’t have this help readily available what do you do?
If you don`t already have a good sport plane or entry level pattern plane, buy the best one you can afford. I recommend getting a good second hand air frame that has proven itself in competition by an active pilot. These can be found on the Internet or at a local pattern event. There is always someone selling a good airplane at the local events; I would look there first. Most times, these guys will even help with the info on recommended equipment and setup. After you have a good plane, refer to the list below.
- Tools – You should have a throw meter, a decent incidence meter, a way to check the CG pretty accurately; also an understanding on how to program the airplane surface responses correctly with the radio.
- Most current airplanes will have info already available through the manufacturer or you can find a thread on a blog on the Internet. It will give you a starting point and generally be pretty accurate from CG to throw settings.
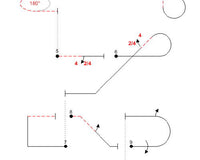
- Study and learn your pattern. Fly your pattern on a simulator or with a stick plane to understand what the requirements and skill levels are. This will get you in gear faster and you won’t waste time in the air trying to remember what maneuvers to do next.
- Try to partner with a friend or someone who can help guide you in your new-found passion; a “Flying Buddy’ or coach. It`s good if you approach someone for help who has participated for a while and understands the ins and outs of the game. This will keep you from feeling frustrated and also make you feel at home at your first contest. He can also call for you at the contest, and if you’re lucky, at your home field as well.
- Join your country`s pattern organization. This is where pattern resources can pay off big. There is usually a website full of how to information to help you get going in the right direction.
- Buy my trimming guide, “Triangulation Trimming”, from https://www.ckaero.net or https://precisionaeroproducts.com.au. At first, you may not need it but as you move up in the classes, it’s a great resource guide to help you reach the next level of trimming your airplane to perfection.
Airplane Setup
I mentioned tools first in the bullet points because pattern is about precision. Precision in air frame craftsmanship, radio setup, and airplane control setup.
It`s important to get repeatable results. Fly the same pattern time and time again whether in practice or in competition in order to build consistency. Before you go out to” try your luck”, you must set the airplane up for the best results and you must make yourself repeatable first before you can adjust the airplane.
With a good throw meter, you can get a good idea where your throws are and how good the geometry is on your control horns and surfaces. I recommend the CRC throw Meter from Central hobbies {Part#: HBKCSTG} or, my favorite at the moment, from Mile High RC (https://www.milehighrc.com) called the Miracle RC Throw Meter. These are both fantastic; the Mile High RC meter can be read from both sides and costs twenty US dollars. Central Hobbies (https://www.centralhobbies.com) sells theirs for around ten US dollars. Each is a very good investment for the tool box. You have to discipline yourself now measuring, recording and understanding the importance of knowing exactly where your throws are set; even more so as you advance through the patterns and start snapping the plane.
Here is a basic setup for any pattern or sport pattern airplane:
To fly the first couple classes, you only need to use low rates on Ailerons and Elevator. Use a high rate on rudder for stall turns, but low rates for the rest of your flight. Moving up, you will need to start assigning switches for particular surfaces and you may need to use condition switches for spins, snaps and different maneuvers that demand more out of the airplane. For now, if you are starting in the lower classes, keep it simple. Very few to no switches or conditions will be needed to compete. To fly this approach, look at the settings listed below.
- Ailerons – Set to 12 degrees of throw up and down, no differential.
- Elevators – Set to 12 degrees of up and 14 degrees of down. You can do everything needed in the pattern including landing with these settings.
- Rudder – Set the throw to max throw for high rates and 60% of that for low rates.
- Throttle – You want a linear setup. For servo-driven throttles (glow / gas), set the ATV/Endpoints to be as close to 100% at both ends. This will give the best throttle feel from pure geometry and then you can add a throttle curve to get the feel as you like. For electric aircraft, set the endpoints of your transmitter in accordance with your ESC’s recommended procedures but maintain as close to a linear curve in the transmitter as possible.
- Expo – Expo feel will vary whether you decide to use a tray or hold your radio with a strap but they would generally be in the -20 to -25% range for Ailerons and Elevator and maybe a little higher up to -40% for high-rate rudder. The throttle should be as linear as you can make it. Half throttle on the stick should be near half of the total RPM before you start adjusting for your curve. The throttle setup is as important as the rest of the surfaces so don`t overlook this step. In the higher classes, the throttle and rudder application skill is what makes champions. I like to call the Throttle a second Elevator.
In the tool requirement section, I mentioned that a very important tool required is an incidence meter. This will help you make measurements and make your airplane fly the best it can. I recommend starting with the Robart Incidence Meter/bar. As your sequence and airplane requires finer tuning from the air frame, you can move on to the Digital units. I think the best available is Wixley. They make the #300 series and it is my favorite. It’s very light, accurate, and cheap which is perfect for our needs and only about $35.00 US.
Now that you have these tools, let’s do a basic setup. Set your surface throw end points like I mentioned earlier. Set your model up on a good table. If you have a reference line offered by the manufacturer, find it and make it level. Measure that with your Robart meter and/or Wixley, if you have one. Now take your meter and make sure each wing incidence is exactly the same as the other. This will keep aileron trim to a minimum. If, when you test fly the model, it still needs trim, re-measure and make sure this is accurate. If you find no misalignment, you have a warped wing, warped or misaligned wing/stab, warped ailerons or a fin/rudder out of square. Chances are you will have minimal trim when the wings are accurately set to each other, if none of these has a problem.
Next, let’s move to the stabs. If they are adjustable, they are most likely not perfect. Take the time to measure this and get them right because almost all trimming issues start with misaligned stabs or elevator halves. If you can clamp the elevators to the stab half tips, do it. I use clothes pins or spring clamps, available at the hardware store. Use the incidence meter to check them. They should be set the same, as perfect as you can measure (I recommend that all lower class models should have a one-piece stab to avoid the hassles of setup and avoid the problems associated with a poor adjustment). Next, you can sight the elevator halves from the rear using carbon rods taped and extended from the top surface of the elevators. Put one or two rods on each elevator side and sight them from the side, if your elevators halves are still clamped and the rods are parallel with each other, you’re in good shape. If not adjust as needed. This could be as simple as using an iron or heat source to warp the surface straight, or adjusting each stab if the elevators are not warped but not aligned due to misalignment of the stab halves. This is probably the most important step of the setup process. Spend as much time as you feel is needed to be sure this step is as accurate as possible.
Center of Gravity
This is one of the most important things which affects how your airplane performs throughout the entire pattern schedule; second only to stab alignment. Measure the CG according to the instructions for the airplane as accurate as possible. Record it, allowing for flexibility to move your flight pack for electric or other equipment including receiver battery packs if it’s a glow plane. Put marks on the plane to show where you are currently flying the CG so you can easily reference it later. Mark where the original directions said it should be as well.
Now Let’s Fly!
Test fly the plane carefully and trim the plane for hands off level flight. Make multiple passes and be sure your airplane performs with no deviation from the flight path. When satisfied, fly a vertical up line and do a few rolls and inverted passes. Next, fly some loops all directly into the wind. With good luck, your airplane flew as good as you hoped. If this is not the case, I will discuss the most common issues dealing with incomplete setup or warped /crooked wing and stab.
Here is a list of possible issues during your setup test flight and basic corrections needed to repair the problems; all corrections are listed by priority.
AIRPLANE WANTS TO ROLL DURING UP AND DOWN LINES AND WHEN FLOWN INVERTED
- If the wings are plug-in, check to make sure they are tight in the anti-rotation pins and do not have slop, which allows the wings to move.
- Wings are tight but not perfectly aligned with each other (same incidence)
- Stabs not set with the same incidence/elevators not set even. (This is even more critical as you advance in the top classes)
WHILE PULLING OR PUSHING A RADIUS THE AIRPLANE STEERS LEFT OR RIGHT IN THE RADIUS OR, WHILE PERFORMING A LOOP THE AIRPLANE CORKSCREWS AND WILL NOT TRACK STRAIGHT
- Check and adjust the rudder trim
- Check the stabs and check the elevator halves throw end points. Make sure they are set exactly the same.
- Check the wing alignment and make sure it’s square to the fuse
THE AIRPLANE FLIES GOOD BUT IS VERY HARD TO HOLD INVERTED FLIGHT
- Make sure you used the basic throw setup above; check again, if it’s good, try to reduce the expo for a more sensitive touch.
- Move the CG back and forth a little to see if there is improvement
- Check the elevator neutral settings. They must be perfectly aligned at neutral and for full throw
THE AIRPLANE GOES TO THE CANOPY IN THE UP LINE
- Move the CG back and test again.
- Make sure the wings are set positive to the thrust line; at a minimum of 1/2-degree positive to the thrust line
- Increase the engine down thrust
This is a basic trim setup guide for entry level and lower level patterns. My in-depth guide is not needed until you demand more out of the airplane. When you advance, I recommend that you get a copy of my Triangulation Trimming Guide. It has much more detailed adjustments. If you are happy with your model setup and the airplane seems to fly as good as you can, or better than you, you’re ready to start practicing the pattern. Study the pattern and learn to fly it from memory. Never rely on your caller for more than a few outings and, certainly, not at a contest. You will advance in your concentration and ability to do more than one thing at a time while flying such as flipping a rate switch or thinking through a flight strategy for wind or sun adjustments.
This is an excellent starting setup and a basic starting point. It is very important, in any discipline, to establish a good foundation of habits and be able to duplicate a consistent routine of practice. Remember, consistency and accuracy is what makes precision aerobatics a discipline. If you start with the best setup and do your best to improve in the right steps, I promise, with hard work and good effort, anybody can improve and justify the devotion and, eventually, bring home some trophies!


1 comment
Peter Fynn
I have built and flown models (FF, CL and RC) for some 60ish years and have never found such a comprehensive and useful series (Setup, Triangulation). I am building, and will compete in, RC Scale and in F3RES (gliders), both of which need a properly built and trimmed aircraft. I have spent this afternoon going through your publications and will buy your field guide this evening.
Thanks to you for publishing this stuff for people like me – who may not compete in RC aerobatics – but, nevertheless, need a plane that has to fly specific tasks well (RC Scale and/or glider F3RES) and which need to be properly trimmed to perform.
I know it takes time and effort to put this stuff together and I appreciate what you have done.
Thanks,
Peter