Straight from the workshop of CK Aero and Bryan Hebert, here's a simple and solid way to install wheel pants on your pattern plane. One thing that is important to remember is to mount your wheel pants high enough that the wheel pant does not drag on the grass. Although it looks very cool to have less of your wheel showing, we recommend mounting it so that the bottom of the wheel pant is at least as high as the wheel (not the tire) itself. This will help keep the wheel pant from getting tore up on landing and takeoff when the tire compresses. Here's Bryan's instructions:
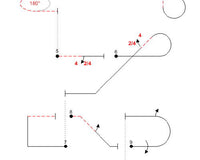
Insert 3/32″ aircraft plywood with good CA. Don’t be skimpy as this is the support for the wheel pant. It doesn’t take a ridiculous amount but make sure it is glued in well and solidly.
Next, drill a hole 1/4″ from the bottom in the center of the wheel opening. This distance should be perfect for the wheel (not the tire) to be below the bottom lip of the wheel pant which will reduce problems with the wheel pants on landing and takeoff when the tire compresses.
On the gear, drill an 1/8″ hole 1/4″ from the bottom and in the center of the gear. This, of course assumes you’re using a 1/4″ axle. Adjust accordingly for your axle size keeping it centered and leaving enough material to support the axle below the hole. A 1/4″ axle is more than sufficient for our purposes.
Very carefully, saturate / paint the 1/32″ ply with CA glue to harden the plywood. This helps prevent the axle from smashing the wood as it is tightened down. If the wood gets compressed too much, it will allow the axle to loosen and spin off. Besides the possibility of losing the entire assembly, we don’t want a zero for our flight!
Make absolutely sure that you use blue lock-tight on all the parts. Again, we want to prevent loosening of any of the assembly. Continue to check for the wheel itself is moving freely and there are no obstructions.
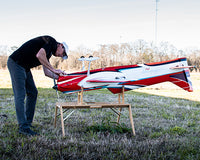
In the end, this is what you’re aiming for.
Using an Allen wrench, secure the assembly to the landing gear. You can also drill a small hole through the gear and pant that goes through the plywood and use a small screw, maybe a servo mounting screw that will act as an anti-rotation screw and keep the wheel pant nice and straight.* This will give you 3/4″ of distance between the ground and the bottom of the wheel pant. You can now easily fly off of grass.
*If you use an anti-rotation pin, make sure your wheel pant is parallel with the ground and that neither the front or the back of the wheel pant drag on the ground BEFORE choosing the location of the pin and angle of the wheel pant. You can always place something beneath your tail wheel on a level surface and “level” the plane to figure out how you want the pant to sit. This is extremely important to do if you lock the pant in a fixed position with the anti-rotation pin.