This article is written by valued CK Aero contributor Earl Haury
“Making Weight” is a weird term that refers to a pattern aircraft being under the maximum weight allowed by the rules. The term has come into vogue with the advent E power which requires weighing with batteries that may weigh 25% of the total airplane. While local contests generally don’t verify the weight of aircraft being flown, any flown at the Nats or WC will be checked.
Every competitor should be certain of their aircraft’s weight. The price of an adequate scale has dropped drastically in the last few years. Scales are available from Amazon for less than the cost of a prop. (Yup, I know props have gotten more expensive.) Pattern airplanes consist of many parts with the builder / assembler making choices as to which parts to use. While function and personal preference enter into selecting those parts, minimum weight should also be a criteria for every part used.
A good builder will weigh everything used in construction to ensure the least weight for the desired strength. There are many articles published describing the best practices to build the lightest possible airplane. However, many pattern airplanes being flown currently are assembled from a manufactured ARF. The assemblers aren’t always skilled builders and their equipment choices often add more weight than the designer intended. The result is an airplane that doesn’t “make weight”. Generally the sweet spot for a naked ARF is < 2400 grams and every milligram added is critical. The focus of this article is where weight may be saved during ARF assembly.
Two scales are needed. Scales with the capacity to weigh a complete airplane and the resolution to weigh small parts accurately are very expensive. So one “coarse” scale capable of weighing a completely assembled aircraft and another “fine” scale capable of measuring small items is the most cost effective way to go.
The “coarse” scale should have 6000+ gram capacity with a resolution of ± 5 grams or so. The “fine” scale should have 500+ grain capacity with a resolution of ± 0.1 grains. Note the distinction between grams and grains! One grain = 64 milligrams (0.06 grams). Why not just use a scale with milligram resolution? They’re expensive. Ammunition reloaders use less pricey scales that weight in 0.1 grain increments. A small (50 year old) mechanical balance is fine! Don’t get hung up on scale accuracy, precision, resolution, repeatability, etc. as improvements in each add to the scale price with little additional value. Auto zero and tare are useful features.
The 6000+ gram range of the larger allows for some sort of airplane holder. I use a Robart foam stand. A small platen will require a plywood plate “adapter”. A 5 kg. test weight (from Amazon) is a necessary accessory to ensure an accurate reading. (Lab grade / certified weights are expensive and totally unnecessary.) Both FAI & AMA allow an overage of 50 grams to allow for scale variance, so super accuracy isn’t necessary. A point on this, target the max weight permitted without the 50 gram allowance or you may regret it.
OK, so you just received your new Alchemy Pro or Bipe and you’re ready to start installing things to get it in the air. Now is the time to “make weight” – not after everything is installed. Remember that beside the rules, lighter does fly better! Put your small scale on the bench and weigh each item you plan to install as well as each possible option. Use the lightest with consideration for the minimum strength needed. Record the weight of each item used and that of the options not chosen. You’ll be amazed at how the tiny differences add up.
Most are aware of weight differences in the larger components, but picking off grams here and there is critical. A few observations regarding small items that make a difference:
There are lots of steel bolts that can be replaced with titanium, they weigh 2/3 as much. Think servo arm screws, engine / motor mounting screws / motor assembly screws, landing gear mounting, axel mounting, etc. The RC car suppliers have every size Ti bolt needed. Some screws can be aluminum which are half the weight of steel, servo mounting and spinner center screw are a couple of applications.
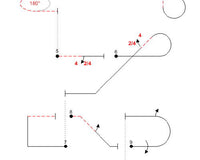
E linkage may be sized 2-56 with aluminum ball ends and 0.070” CF rods epoxied into the ends. Make them the right length and forget adjustable.
Horns cut from 0.030” or 0.040” CF plate and glued into a slot in the surface are very light.
Take a hard look at servo extensions. With HV systems standard wire is fine and lighter than the heavier gauge HD leads. Extension to servo connectors can be removed and the leads soldered together – great for getting the exact length also. There are opportunities to reduce the weight of Sbus leads for the adventuresome.
The 10 gauge wire on some batteries and ESC’s is nuts for pattern! Change it to 12 and keep it short. Consider using 13 gauge if weight is critical.
It’s easy for weight to creep in during equipment installation. Don’t reinforce structure! The designer has built it as strong as necessary. An exception might be the landing gear mounting if you’ve a rough runway. (Or land as I do sometimes.) CF plate is a pain to work with but the lightest way to strengthen a LG mount. Firewalls / motor mounts needn’t be heavy – 1/8” ply or 0.040” CF is good. Be stingy with the epoxy. Carefully look over the structure for places to remove material. Composite fuselage flanges are often wider than needed – ¼” is enough, grind off the excess.
Battery mounting deserves a lot of consideration. Ejecting a battery is never good, but a heavy tray isn’t either. CF tubes across the fuselage with ply donuts are sufficient as long as the tray floor is securely fastened to the tubes. Here’s some heresy: Velcro is a heavy and unreliable way to fasten a battery! Consider a couple of nylon bolts and a CF plate as a battery hold down. I use one stainless steel 4-40 stud and nut as a battery clamp plate.
Likewise with the Velcro straps for RX retention. Convenient but heavy. Double sided tape works well. OK, maybe a small Velcro strap is appropriate for a RX battery if you use one. Use no more RX battery capacity than necessary, use HV components without a regulator and ditch the switch.
A really big item for E is the battery. Heavier batteries often last longer, cost less, and have more capacity. I’ve seen no evidence that C ratings (such as they are) above 25 provide a benefit and they are heavier. Again, get rid of / shorten 10 gauge wire. Use the lightest connectors you’re comfortable with. The big advantage of sweating the small stuff during assembly is that there may be more weight room for heavier batteries.
You get the point. If there’s something lighter than you’re using in your airplane, what you used is too heavy. Now that you’ve micromanaged weight to the max (min?), it’s time to weigh the results. All the missing milligrams are about to be appreciated! The ideal weighing process is to put the aircraft holder on your large scale and tare it (sets the scale reading to zero). Add the test weight and note the reading. If different from the test weight calibrate the scale to the test weight or note the difference to add or subtract from the aircraft weight. Replace the test weight with the aircraft and bingo – you now know if you “make weight”.